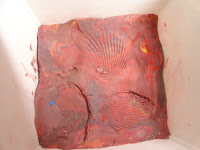
We have been studying soil and rocks for a few weeks. To end our
unit, each 3rd grader made their own plaster of paris fossil. We
recycled empty (and cleaned!) milk cartons to create these fossils.
After cutting down the carton, piece of modeling clay is pressed down
into the bottom. Be sure to fill all the corners of the carton! Then,
the students use shells to make impressions on the modeling clay. The
plaster of paris is then poured over the clay. Let it set up and then
tear away the carton & peel off the clay. Each student will have
their own fossil to keep!
Tuesday, October 30, 2012
Monday, October 29, 2012
Election Time!
My first year of teaching was 2008-2009 and I had so much fun teaching my third graders about the election process that year. They are at the age where they are beginning to grasp harder concepts of social studies and the large effects of individuals' actions. That being said, I am very much looking forward to teaching through another election year! As we draw near to Election Time, here are some ideas to use in your classroom.
The first thing we talk about is the importance of voting. In order to vote, citizens must be registered with their county. I made voters' registration cards for the students to decorate (idea from The First Grade Parade). Thhen we vote in an activity I call Majority Wins. The students vote on some of their favorites (ice cream, book, toy, pet, color, etc.). We graph the results and discuss the word "majority". The students do a quickwrite about the importance of their vote.
As a class, we discuss important qualities of a President. My students do a graffiti writing activity to come up with a "Top Ten" list of what a President should be. They have to keep passing the paper around their table adding qualities until the timer goes off. Then the group ranks the qualities they came up with. Each group presents their top qualities and defends them to the class.
We learn about the Presidential candidates as well. I have pictures of Obama and Romney displayed while we fill out a Venn Diagram about them. The ideas they have are quite entertaining!
The first thing we talk about is the importance of voting. In order to vote, citizens must be registered with their county. I made voters' registration cards for the students to decorate (idea from The First Grade Parade). Thhen we vote in an activity I call Majority Wins. The students vote on some of their favorites (ice cream, book, toy, pet, color, etc.). We graph the results and discuss the word "majority". The students do a quickwrite about the importance of their vote.
As a class, we discuss important qualities of a President. My students do a graffiti writing activity to come up with a "Top Ten" list of what a President should be. They have to keep passing the paper around their table adding qualities until the timer goes off. Then the group ranks the qualities they came up with. Each group presents their top qualities and defends them to the class.
In order to promote voter information, the students practice voting again. What they do not know if that they are voting on two different ballots. One ballot gives little information while the other explains a topic ( Ballot A: Recess; Ballot B: Recess will be replaced with 20 minutes of sit-ups and push-ups). Then we discuss the importance of knowing about what you are voting for.
I recently found a worksheet asking students to create a budget for campaign advertisements. I gave my students a $10,000 budget to work with. They must decide how much they want to spend on the advertisement options I gave them: tv ads, billboards, radio spots, mailings, phone banks, and/or yard signs. Students will also defend how they decided to spend their money.
The day before our mock election, students will journal "My Wish for the Nation". What would they like to see happen in our nation? How do they picture the future of our country? Think of what is important to them. For my third graders, they have just ten years until they will be voting as well!
We will hold a mock election on November 6th. The students will vote for who they would like to see as the next President/Vice President of the United States. We will graph our results. I will also remind students to watch the news that evening to see the nation's election results.
Post-Election, we will graph the nation's votes. We will also color in the states red or blue based on which way they voted. It is awesome to hear their opinions and views of our nation and why one state went blue or red.
Here are more resources: Election Time and Scholastic's Election 2012
Wednesday, October 17, 2012
Parent/Teacher Conferences
The parents are coming! The parents are coming!
Here are some resources to help you with Parent Teacher Conferences. They are available on my TpT site. There are four pages:
Here are some resources to help you with Parent Teacher Conferences. They are available on my TpT site. There are four pages:
- Students Self-Reflection: students grade themselves on their performance thus far in the school year
- Homework for Parents: students just LOVE to take this home to give their parents some homework; this document asks parents questions about their child and the school year; it will help you as you prepare for individual parent conferences
- Student Reflection: a second student reflection, perhaps for older students or for spring conferences
- Students Grade the Teacher: students grade you, the teacher
Friday, October 12, 2012
Monster Week
At the end of year quarter, third graders take Quarter Tests (QTs). These tests assessment them over what they have learned during the quarter as well as preparing them for state assessments in the spring. Because of these tests, our schedule changes a bit. We are on a flex/break week for our StoryTown reading curriculum. So our third grade team decided to infuse a little more fun into reading and math! Welcome to our MONSTER WEEK!
Here are the resources I used from TpT freebies:
Here are the resources I used from TpT freebies:
- 3-Digit Monster Addition
- Monster Bookmarks
- Loch Ness Monster
- Frankenstein art
Saturday, October 6, 2012
Sack of Spooks Art Project
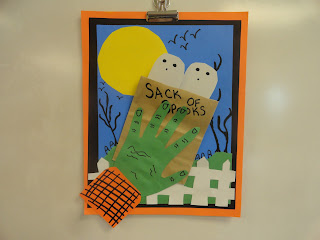
It's time for a Halloween art decoration! Each year, our 3rd graders make a Sack of Spooks as a classroom (then home) decoration. It is a project heavy in step-by-step directions, and the students love it!
First, you layer orange, black, and blue paper on top of one another for your background. Next, add a yellow, circle moon in one corner. Take a smaller piece of green paper and rip it sideways to create your hill on the landscape.
On a separate piece of green paper, students trace their hand. Cut out the hand, give it fingernails, wrinkles, just enough to make it a little creepy! Use a small piece of orange paper to create a shirt cuff to glue onto the hand. Cut down a lunch paper sack to glue onto your landscape and attach the hand holding the sack.
Finally, add your ghosts and other spooky details to your Sack of Spooks!
First, you layer orange, black, and blue paper on top of one another for your background. Next, add a yellow, circle moon in one corner. Take a smaller piece of green paper and rip it sideways to create your hill on the landscape.
Next is the most difficult step for my third graders, making the fence.They are given a cut down piece of white paper. My directions are to start at the midway point of the paper for their fence. They need to "go over, straight up, make a peak, straight down, and over again". I tell them to make their fence posts big enough that there are only five to seven peaks along their fence. If they have many more than that, it will be difficult to cut out.
To make the other holes in the fence, we just draw rectangles under our 'flats' in the fence. The fences are supposed to look spooky, so it is okay (or even wonderful!) when they don't look perfect or they are cut funny. Glue the fence onto your landscape.
On a separate piece of green paper, students trace their hand. Cut out the hand, give it fingernails, wrinkles, just enough to make it a little creepy! Use a small piece of orange paper to create a shirt cuff to glue onto the hand. Cut down a lunch paper sack to glue onto your landscape and attach the hand holding the sack.
Finally, add your ghosts and other spooky details to your Sack of Spooks!
Subscribe to:
Comments (Atom)


