Each year, as we are anticipating the arrival of our snowstorm(s), we write a technical piece How To Build A Snowman. We focus on writing sequential paragraphs instead of 1., 2., 3., etc. steps. We discussed all the sequence and transition words they would be able to use in their writing. Then we drafted!
As they edited with a partner, each student read their directions aloud. Their partner used a whiteboard to draw the directions they were hearing. This really helped the students understand what they were missing from their directions. There were many drawing with three snowballs side by side because the author forgot to include the stacking step :)
After final drafts were written, students decorated their own snowman to 'hold' their writing. These snowmen looked more festive than the ones we have made in the past.
Showing posts with label January. Show all posts
Showing posts with label January. Show all posts
Tuesday, February 4, 2014
Monday, January 20, 2014
Martin Luther King, Jr. Research & Mini-Book
As soon as we came back from Winter Break, we started our Martin Luther King, Jr. research. In the past, our students have written a mini research paper. This year, we jazzed up our activity by using Blair Turner's MLK Mini Book (freebie on TpT). The students filled out all kinds of information about MLK and decorated the books. I am holding on to these books to show off at parent-teacher conferences!
More resources:
More resources:
- Clip of MLK's speech - http://www.youtube.com/watch?v=DDsUYTgkDSU&feature=related&noredirect=1
- Animated story of MLK's life - http://www.youtube.com/watch?v=k6Au81aHuSg&noredirect=1
Friday, January 10, 2014
Ice Experiment
I found this great ice experiment from The Mailbox magazine. After having no school this past Monday because it was too cold to be outside, I knew an experiment with ice was perfect! I froze three pie pans of ice at home, ready to be use by smaller groups of students.
The students tested five objects (marble, yarn, paper clip, pencil, rock) on the ice. They were testing how easily the objects moved across the ice. As the students took turns tapping the objects to see if they moved over the ice, they recorded their observations on their paper. They also answered four questions about which objects moved easily/not easily in the ice pan.
After the students tested the five objects listed on the recording paper, I asked the groups to choose at least three more objects in our classroom to test. They LOVED choosing their own testing objects!
 |
| I can't get it to turn sideways, sorry! |
After the students tested the five objects listed on the recording paper, I asked the groups to choose at least three more objects in our classroom to test. They LOVED choosing their own testing objects!
Monday, January 6, 2014
Snow/Cold Day = Cooking Day!
Well, no school for us today! That means new recipes to try and treats to make for me :)
The first thing I made was pull-apart (or monkey) bread. We had some extra Pillsbury Grands Biscuits on hand and I searched Pinterest for a treat to make. And this recipe was SO EASY! Basically, you cut the biscuits in fourths, roll them into balls, then roll each ball in sugar & cinnamon, plop it in your Bundt pan, top with a brown sugar syrup, and bake for 30 minutes at 350*. For the full recipe, visit Main St. Cuisine.
In my crockpot right now is Hash Brown Potato Soup! The best part of this recipe is the simplicity of it. Instead of peeling and boiling potatoes before even beginning the soup, you only have to use frozen hash browns. Such a time saver! To get the full recipe, visit Pearls, Handcuffs, and Happy Hour.
Saturday, February 2, 2013
Super Bowl Prediction
The votes are in! My third graders have predicted the winners of the 2013 Super Bowl to be the San Francisco 49ers. My students decorated helmets and we created a graph to display their choices.
Friday, February 1, 2013
Friday Art: Sunflowers
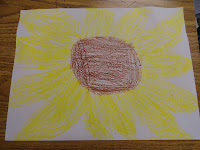
Today we made sunflowers to finish up our week celebrating Kansas's Birthday. We did a crayon resist sunflower with blue watercolors.
Saturday, January 26, 2013
Super Bowl 2013 - Lesson Ideas
Super Bowl 2013 is on the horizon!
Here are some activities for your classroom:


(all photos from JoCo Library site)
Here are some activities for your classroom:
- Football reading comprehension: I found this reading comprehension page about the history of football from ABCteach.com
- Read a book about football to your students
- Gunner, Football Hero
- Dino-Football
- My Football Book
- Coach Hyatt is a Riot
(all photos from JoCo Library site)
- Hold a Paper Football Tournament
- This would be a great way to incorporate math into your Super Bowl celebration, measure the distance each student's football goes and well as keeping score & having play-offs
- Be sure you know how to play and how to fold the football
- Create a graph of your students' predictions of the Super Bowl winner
- Have students color in a helmet with their team's colors, examples here and here
- KidZone.com has more resources of Super Bowl winner predictions
- Find the cities of the teams on a US map and where the game is being played
- If you school allows, have a mini Super Bowl party with treats!
Are you ready for some football?!
Friday, January 25, 2013
Art: Northern Lights
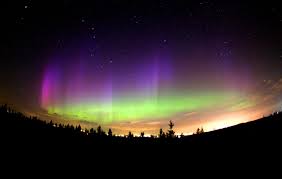
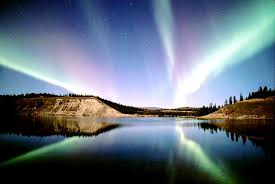
Today's art is a chalk version of the Northern Lights. First, we looked up some pictures of the real Northern Lights and discussed the reason they happen/where they are most common. Here are a couple of my favorite pictures:


Now, onto making our own Northern Lights! Each student was given a 9x12 inch paper (the color doesn't matter for this paper, whatever you have a lot of!). This is our work/scratch paper and will be recycled later. We drew a wavy line that will become the snow covered hills on our finished product. Label the top "Top" and the bottom "Bottom". This sounds silly, but they can get confusing pretty easily once you get started.
The students the students then get a light blue 9x12 inch paper. This paper will be their final product paper. Students take they "Top" paper and lay it on top of the blue paper. Use white chalk along the edge of the non-blue paper. Be sure to make a thick line of white. Once satisfied with your chalk, use a tissue to drag the white down onto the blue paper. You will start to see the snow covered hills!
Next is to create the Northern Lights above your snowy hills. Take the "Top" piece off and lay the "Bottom" piece on the bottom of your blue paper. It should line up to exactly cover the snowy hills. (this is there non-labeled papers can get confused) Students then use colored chalk to make the Northern Lights. They are made in the same way the snowy hills are, except that you drag the tissue up! I like to give my students plenty of colors to choose from so they can make their Northern Lights more individualized.
Here are some finished products:
(images from google images)
Now, onto making our own Northern Lights! Each student was given a 9x12 inch paper (the color doesn't matter for this paper, whatever you have a lot of!). This is our work/scratch paper and will be recycled later. We drew a wavy line that will become the snow covered hills on our finished product. Label the top "Top" and the bottom "Bottom". This sounds silly, but they can get confusing pretty easily once you get started.
The students the students then get a light blue 9x12 inch paper. This paper will be their final product paper. Students take they "Top" paper and lay it on top of the blue paper. Use white chalk along the edge of the non-blue paper. Be sure to make a thick line of white. Once satisfied with your chalk, use a tissue to drag the white down onto the blue paper. You will start to see the snow covered hills!
Next is to create the Northern Lights above your snowy hills. Take the "Top" piece off and lay the "Bottom" piece on the bottom of your blue paper. It should line up to exactly cover the snowy hills. (this is there non-labeled papers can get confused) Students then use colored chalk to make the Northern Lights. They are made in the same way the snowy hills are, except that you drag the tissue up! I like to give my students plenty of colors to choose from so they can make their Northern Lights more individualized.
Here are some finished products:
Subscribe to:
Posts (Atom)


