Showing posts with label Made It Monday. Show all posts

Monday, August 12, 2013

Paper Lantern Fish

I'm linking up with 4th Grade Frolics for Monday Made It!

To go along with my fish theme, I made some paper lantern fish to hang above my desk area. I had a heck of a time finding some sphere paper lanterns! But I finally found some cute ones at Michaels on sale (even better!).

Then, I got to work making these lanterns into fish! I used my scotch tape dispenser as a template for the eyes and just free-handed the fish tails. I used rubber cement to attach the eyes and tails to the lanterns. This was probably the hardest part of the project. I didn't want to rip through the paper, so I had to press and hold it on for a while to get it to stick. Let them dry overnight and they are good!
Use some fishing line (ha!) to hang them up and now you have a cute fishie addition to your classroom!

Monday, July 22, 2013

Classroom Library - Get Hooked On Books!


Here's my first Monday Made It! I'm linky up with 4th Grade Frolics for Monday Made it. I know, I know, it's July and I'm just now making something. I am trying to enjoy my summer. Today, I tackled my classroom library decoration! After working on my library organization, now I wanted to make it pretty :)

I found the great idea below for my library inspiration on Pinterest.
Under the Sea Reading Corner classroom display photo - Photo gallery - SparkleBox
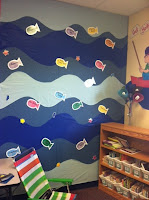
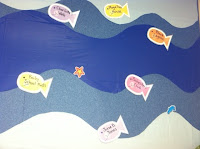
I bought two blue plastic table clothes from Hobby Lobby to create the waves along the wall. This is my "before" picture. Or as close as it could be, I forgot to take one before I got started.
After the waves were along the wall, I added fish with book titles on them. It goes well with the large clip art on the opposite wall that says "Get Hooked on Books" with a boy fishing. I hope my students get hooked on the books in my library! I have a couple beach chairs that the students can sit in to read their favorites.
 

Monday, August 6, 2012

Made It Monday

I'm linking up with Tara over at 4th Grade Frolics for Made It Monday! For today's Made It Monday, I made boys' & girls' restroom passes and their Secret Service kindness projects.

I picked up a couple hand santizers at the dollar store to make my restroom passes. Then, ripped off the labels to get them a little more fishy! I found cute merman & mermaid cliparts and labels boys'/girls' restroom passes. A little ModgePodge and they are ready to keep germs away starting the first day of school!

Secondly, one of my 3rd grade teammates suggested we try out The Fickle Pickle's Secret Service kindess encouragement project. This activity has been all over Pinterest, so I'm sure many of you have seen it! The students are given a "secret mission" to spread kindness all around them! Instead of making "can't do"/"must do" rules for our classrooms, we are going to talk about what our classroom should look and sound like. This secret service project will help the students understand that they can practice kindness everywhere they are!


Sunday, July 29, 2012

Made It Monday - 3rd Grade Kit, Birthday Treats


I'm linking up with Tara over at 4th Grade Frolics for Made It Monday! I was able to complete a few small projects for this Monday It Monday! I put together my students' first day 3rd Grade Kits and Birthday Treats.

First were the 3rd Grade Kits: The attached note reads
  • Smartie: You are a "Smartie"
  • Stick of Gum: "Stick" to it and I know you will be able to do anything!
  • Peppermint: You are "mint" for our class!
  • Eraser: It's okay to make a mistake, "erase" and keep trying!
  • Smile Stickers: "Smile", 3rd grade is going to be a lot of FUN!!
  • We're going to have a GREAT year! XOXO Mrs. Brown

Then I just baggied up those items and stapled the note onto the bag. Quick & easy and such a hit with the students!

Secondly, I put together my birthday treats. I downloaded the birthday balloon outline from Teaching Third. Then, printed on them on bright cardstock, cut them out, and attached them to a birthday pencil and a fancy sucker. Can't wait to give them out on birthdays & summer half-birthdays :)


Monday, July 23, 2012

Made It Monday: Response Feedback Board


I'm linking up with Tara over at 4th Grade Frolics for Made It Monday!

I just have one project to show for this Made It Monday, but I am so very excited to use it this school year! I had originally pinned this student feedback board from Cheryl's Classroom Tips. Then, I saw how The Teaching Thief adapted this board and included a theme. Well, I am amping up my fish theme this school year, so of course I made my feedback board with fish!

First, I di-cut the fish for the board. I decided to do 28 instead of 24 because you never know what could happen in these years of budget cuts. Better to have more fish than not enough!


Printed off numbers and cut them into squares for the fish. Then, I added the numbers and glued everything down!

Finished product!!!!!! Off to the laminator!!!


My plan is to attach this to the wall along with a holder for sticky notes for the students to write their responses. I will either verbally give prompts (i.e., "What is the theme of this story?") or post it near the board (i.e., "When do you use multiplication in everyday life?"). This gives me a quick way to get feedback from my students and know who is understanding concepts in the classroom.

Sunday, July 15, 2012

Make It...Sunday?

I'm either very late or a bit early on this Make It... event! I decided to tackle making pencil bags for my students. They do not have pencil bags on their school supplies list, but it is definitely something that is helpful for them to have in the homework binder. Secondly, I made built-in bookmarks for my student journals.

So first, gather your materials: scissors, quart-sized baggies (the slider close is better so that you don't have to constantly line up the zipper for the students), and some pretty duct tape of your choice. You will also need a 3-hole punch to finish your project!

Measure out how much duct tape it will take to cover the width of your baggie. You can actually measure or just eyeball it each time (which is obviously what I decided to do!). Cut at the length you are happy with. You don't want much overhang, so I cut mine slightly smaller than the width of the baggie.

In order to not have air pockets in the duct tape and to be able to see what I was doing properly, I flipped the duct tape over. Then I could line up the baggie halfway down the duct tape before folding it over.

Then, fold it over and tape it down :)

Final step, 3-hole punch and repeat for all your students :)

In order to make your notebook bookmarks, first gather your materials: hot glue gun, notebooks, ribbon (I chose 1" wide), and scissors. Decide how much overhang of a bookmark you would like; Be sure to fold the ribbon over to see what it will look like before you glue!


Choose bright colors and be sure they are glued in well so they stay in the notebooks :)