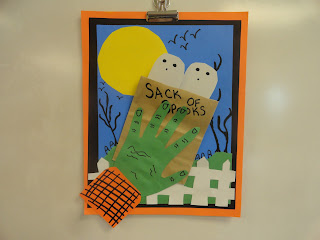
First, you layer orange, black, and blue paper on top of one another for your background. Next, add a yellow, circle moon in one corner. Take a smaller piece of green paper and rip it sideways to create your hill on the landscape.
Next is the most difficult step for my third graders, making the fence.They are given a cut down piece of white paper. My directions are to start at the midway point of the paper for their fence. They need to "go over, straight up, make a peak, straight down, and over again". I tell them to make their fence posts big enough that there are only five to seven peaks along their fence. If they have many more than that, it will be difficult to cut out.
To make the other holes in the fence, we just draw rectangles under our 'flats' in the fence. The fences are supposed to look spooky, so it is okay (or even wonderful!) when they don't look perfect or they are cut funny. Glue the fence onto your landscape.
On a separate piece of green paper, students trace their hand. Cut out the hand, give it fingernails, wrinkles, just enough to make it a little creepy! Use a small piece of orange paper to create a shirt cuff to glue onto the hand. Cut down a lunch paper sack to glue onto your landscape and attach the hand holding the sack.
Finally, add your ghosts and other spooky details to your Sack of Spooks!


Love the sack of spooks project...especially since Halloween is my favorite holiday!! Unfortunately, I have a student who's not allowed to celebrate it this year, but I'll keep this project in mind for the future! :) Thanks for linking up!
ReplyDeleteAmanda
Teaching Maddeness